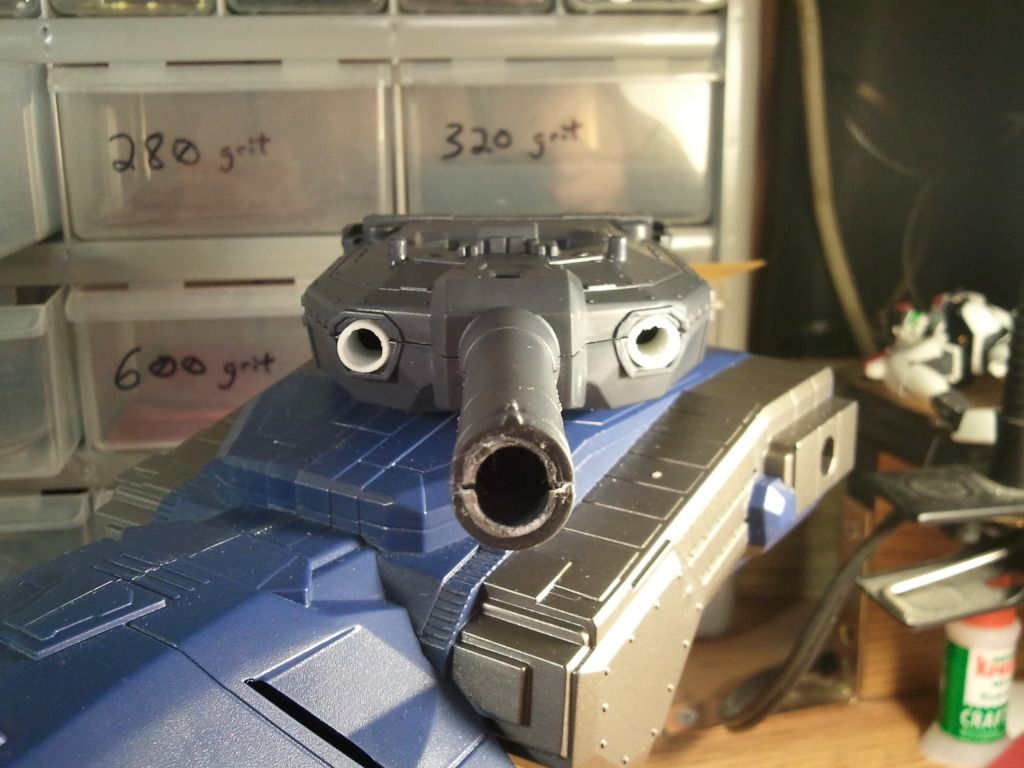
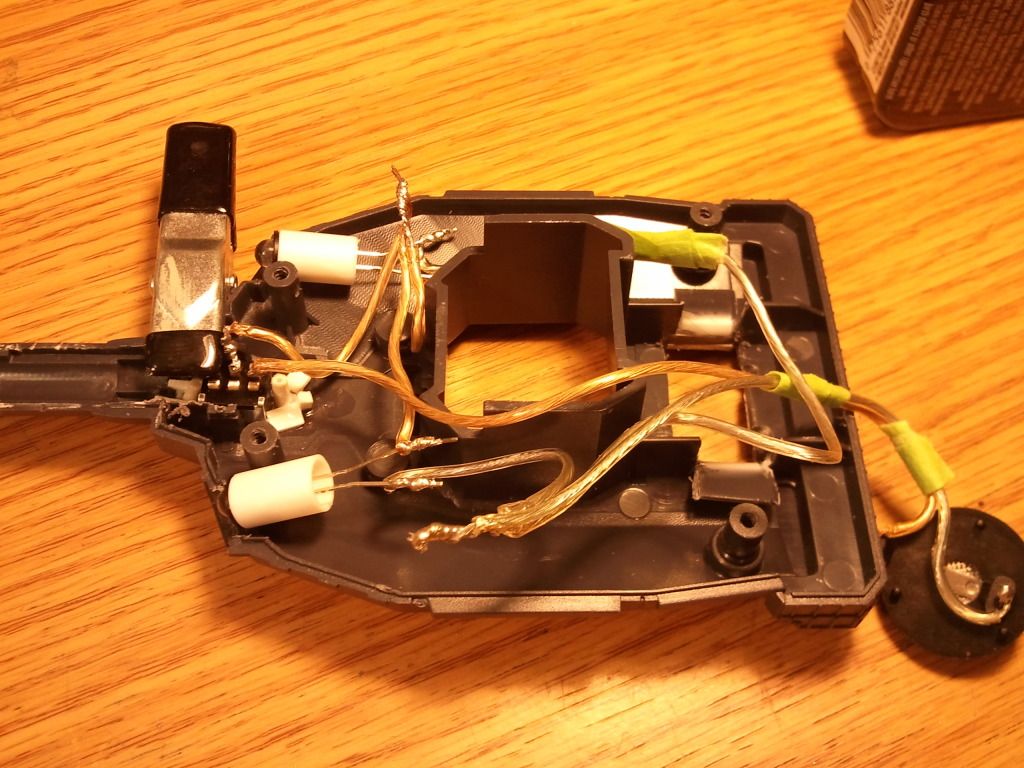
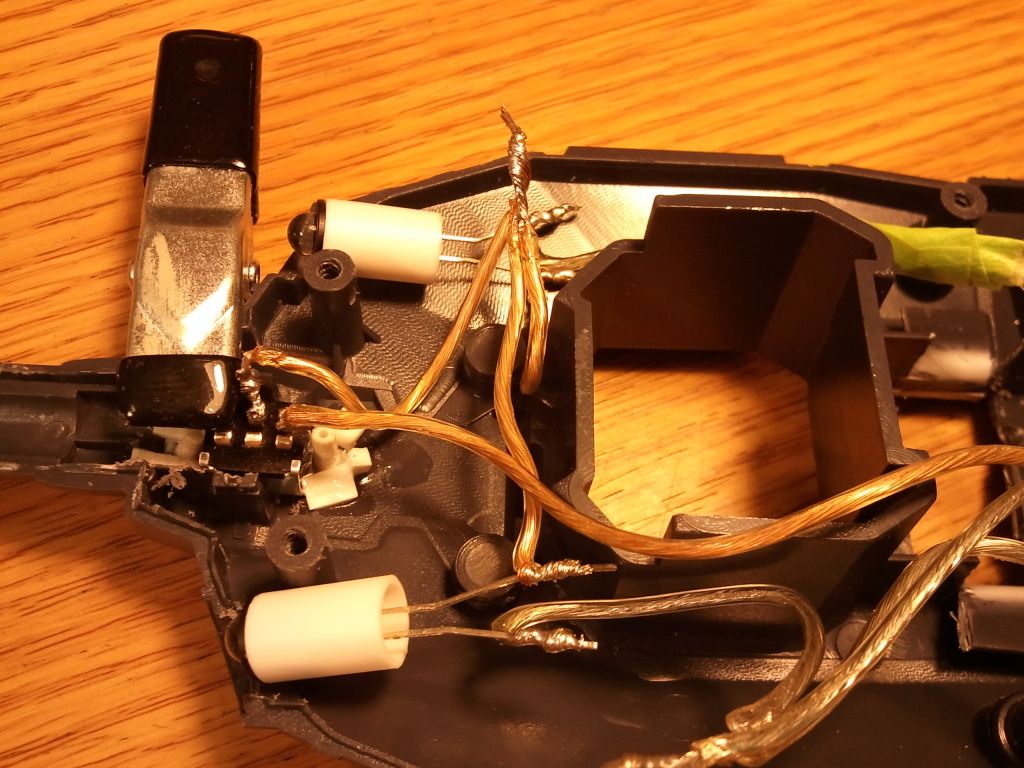
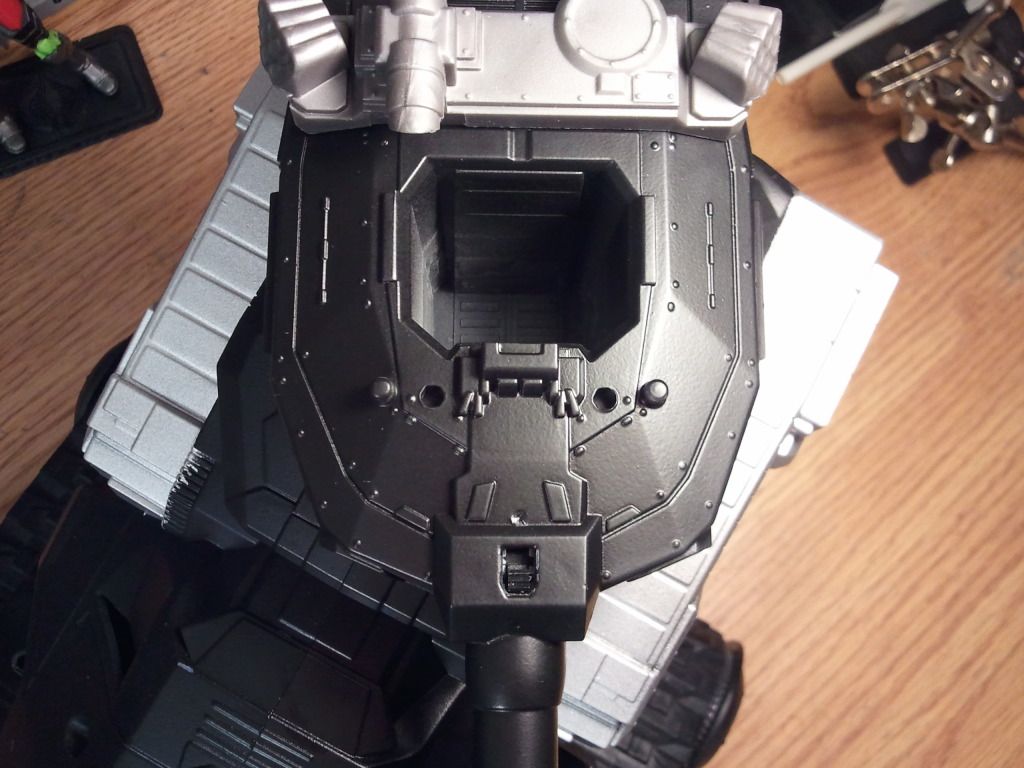
|
Community Links |
Social Groups |
Pictures & Albums |
Members List |
Search Forums |
Advanced Search |
Go to Page... |
|
Thread Tools |
06-25-2012, 10:55 PM | #1 |
B.A.T. Mechanic
Join Date: Jan 2009
Location: Lestah
Posts: 1,123
|
Wouldn't feel right putting this here if I hadn't finished up the couple paint details I've been wanting to fix. This gives me a chance to rewrite the tutorial portion to hopefully read a bit better.
As soon as I first saw images of the production V6 Hiss tank, I knew I had to get at least one. Lucked out and grabbed one well before the original line launch date thanks to a great customizer and fellow tanker: Air-tight. I really love the general look of this new Hiss, but upon assembly, was quite saddened by the lack of moving treads, though I understand why Hasbro made decisions such as this. No less disappointing though. At first, I was only going to simply add the moving treads from the V5, but as you'll see in the next post or so, I went a lil overboard. Anyway, upon seeing how much time it'd take to mount the entire V5 chassis onto the V6 body, I decided to just swap the treads themselves. The first post of this thread will be a pseudo tutorial for anyone else wanting to go this route. Please note, I do not have extra sets of moving treads available...sorry. The rest of this thread will show the direction I ended up taking after that. Adding this in the first post to be safe: Paint used was Krylon Fusion for Plastics black, Krylon Silver Metallic and a couple coats of Krylon matte clear. So, onto the tread transplant: I grabbed an extra Crimson HISS for $15 from a Walmart and did some rough measuring on where the treads connect on both the Crimson and Retaliation versions. Truth be told, trial and not so much error yielded better, faster results for my purposes at the time. 1. First, on the moving tread, the nub on the inside of the receseed hole(with the connecting peg in the center,see pic #1) needs to go. This will only need to be done on the connecting point that will be towards the front of the HISS, the back point has no nub.There are too many methods to list, I simply used a chisel end Xacto. Also, pic #1 is from an unaltered brown V5 tread, I had forgot to take a pic of the one I modded. 2. Then Using a relatively new drill bit, I taped off 3/16" to use as a guide, kinda like a router bit. I used the bit in a dremel, but a drill and a steady hand should work the same; and 'routed' out or expanded the recessed hole of the Crimson HISS's treads(see pic #2). I kind of left it looking rough to better show what was done in the picture but it ended up working out to fit just fine in my case. 3. Next, I used the closest drill bit I had to the diameter of the connecting peg of the moving tread to roughly(and in this case,hastily) expand the mounting hole on the Retaliation chassis(see pic #3). Be patient and only remove a little bit at a time on both the chassis and treads and keep fitting. The outer ring on the Retaliation chassis should eventually slip into the now enlarged recessed hole of the moving tread and peg should slighly pop(may not hear it) into the enlarged hole of the chassis If it is too loose, a lil glue should be fine, I lucked out on my first try and they will stay on but can still be popped off if I want to further customize or paint. Pic #4 shows the end result of the tread swap. All in all, it really didn't take much time or effort, but I like it better already. Nub that needs removing: Enlarged recess on V5 treads: V6 enlarged chassis holes: Voila:
__________________
Handmade action figure and diorama accessories: https://www.etsy.com/shop/BoMCreationz https://www.facebook.com/BoMCreationz Instagram: Fesifisky Last edited by Fesifisky; 10-18-2019 at 12:42 AM.. |
06-25-2012, 11:04 PM | #2 |
B.A.T. Mechanic
Join Date: Jan 2009
Location: Lestah
Posts: 1,123
|
After getting the treads on, I took apart the Retaliation turret(had to cut/break the barrel end off, but that's why there's glue), and drilled out what looks to be perfect spots for LEDS(see pic #1 below), there's even plenty of inner space for wires and batteries.
Pics 2 through 4 show the final mockup of the turret lights. Unfortunately, I failed to take a picture of the final wiring before putting the turret back together, but it really mainly included adding heat shrink tubing, works so much nicer than electrical tape. The silverish-gray panel that pops off the top of the turret makes a great spot to hide where I put the battery...it'll be easy to replace if need be. I just cut a rectangular hole below it just large enough for the button cell holder. For anyone wondering about LEDS, I used this great and easy to follow tutorial: LEDs | The Fighting 1:18th!. As far as the switch for the turret lights, the hole where the missle launch button previously was, worked quite nicely. Though the underside needs to be dug out depending on what switch you use(I used a small slider from radioshack), I used a large engraving dremel bit and then the drillbit routing method again to clean up the sides. I'm sure I could have done a better and neater job of mounting the switch, but it was late and was getting tired. LED locations drilled out and styrene tubing glued in place: Final mockup of LEDs including battery: Closup of switch in place of missle launch button: Topside of the switch: Proof my soldering skills haven't left me: Turret painted and lit up: Another angle showing the treads too:
__________________
Handmade action figure and diorama accessories: https://www.etsy.com/shop/BoMCreationz https://www.facebook.com/BoMCreationz Instagram: Fesifisky |
06-25-2012, 11:05 PM | #3 |
Banned
Join Date: Jul 2008
Location: Texas
Posts: 29,433
|
Oh my! That is pretty damn awesome!
|
The Batman |
View Public Profile |
Find More Posts by The Batman |
06-25-2012, 11:09 PM | #4 |
B.A.T. Mechanic
Join Date: Jan 2009
Location: Lestah
Posts: 1,123
|
This section is for the rest of the LED install as well as finished pics.
First pic below shows the nose section. Sadly, I messed up on the second hole for the chin LEDs, one is slightly lower than the other. The plastic it's made out of is a pain to work with and didn't want to risk destroying the whole piece so I'll leave it be...for now. I may go back in the future and rework it. The following 3 pics show the wiring for lights inside the 'vents' on the body, which were boxed in on the inside(painted silver for contrast) and bright blue rectangular LEDs installed. Here is where I mounted the switches for the body and interior lights. 1 switch operates the nose and vent lights. The other operates the bright red LED inside the cockpit: Cockpit LED was installed off to the side to avoid being in direct sight. Here it is lit up: Whole thing lit up in the dark: Before final silver application to the canopy: Added some color and decals to tread assemblies: Gattling painted: And now the final pics(forgot to put on the 2nd Gattling, but I think everyone gets it):
__________________
Handmade action figure and diorama accessories: https://www.etsy.com/shop/BoMCreationz https://www.facebook.com/BoMCreationz Instagram: Fesifisky |
06-25-2012, 11:26 PM | #5 |
Cobra Cannibal
Join Date: Sep 2011
Location: Western Colorado
Posts: 85
|
I absolutely bow at your skills, seriously a work of art!
__________________
-Everything is true. God's an Astronaut, Oz is Over the Rainbow, and Midian is where the monsters live- "The world needs more cannibals" |
06-26-2012, 10:50 AM | #6 |
Free Agent
Join Date: Mar 2008
Location: Houston
Posts: 1,082
|
Fantastic - I will be following your steps for sure (well, maybe not the lights, I'm not that good)!
|
06-26-2012, 10:55 AM | #7 |
B.A.T. Mechanic
Join Date: Jan 2009
Location: Lestah
Posts: 1,123
|
Thanks guys, really means alot! And I think I forgot to mention this at least here, but this is my very first completed Joe custom vehicle.
Hoping the 2nd one comes out even better.
__________________
Handmade action figure and diorama accessories: https://www.etsy.com/shop/BoMCreationz https://www.facebook.com/BoMCreationz Instagram: Fesifisky |
06-26-2012, 11:00 AM | #8 |
Cobra Viper
Join Date: Feb 2009
Location: CT
Posts: 351
|
I have some fierce nerd-love for this thing!
|
06-26-2012, 12:11 PM | #9 |
Cobra Viper
Join Date: Mar 2012
Location: Louisiana
Posts: 125
|
Wow...very impressive...The lights look awesome. I'm going to have to tank the time and learn how to do that.
|
06-26-2012, 12:45 PM | #10 |
XXXtreme Keyboarder
Join Date: Apr 2011
Location: satan's skillet
Posts: 4,070
|
Quote:
Wow man, incredible work for your first attempt. Talk about hitting the ground running! |
Similar Threads | ||||
Thread | Thread Starter | Forum | Replies | Last Post |
Vehicles Retaliation HISS upgrades Part 2 | Fesifisky | G.I. Joe Customs Works In Progress | 28 | 10-03-2012 04:58 PM |
Vehicles Retaliation HISS 'upgrades' | Fesifisky | G.I. Joe Customs Works In Progress | 31 | 06-26-2012 12:12 AM |
Vehicles Black Retaliation HISS and DG CC | Owner of a Lonely B.A.T. | G.I. Joe Customs Finished Projects | 1 | 06-03-2012 03:20 AM |
Just bought the Retaliation HISS V6 at TRU... | Dolemite | G.I. Joe News and Rumors | 161 | 05-30-2012 05:23 PM |
who is the retaliation hiss driver? | jmc2915 | G.I. Joe Toys Modern & General Discussion | 29 | 02-16-2012 03:41 PM |
|
|
Recent Off Topic Threads |
What song are you listening to? |
Streets of Rage 4? by Jakks Pacific |
JazWares 18th Halo |
Hisstank Late Night thread... |
DarkLordMordred... |